The following article EMIN will guide you on how to remake alloy or high-speed steel drill bits, helping them work well again and be ready for the next machining.
How to sharpen drill bits properly to ensure machining efficiency
One of the factors that determines the accuracy of drilling is the condition of the drill bit. When the tip is worn, blunt or unbalanced, the cutting force is no longer optimal, which will reduce the quality of the drill hole, even causing errors during the machining process. Instead of throwing it away, proactively sharpening the drill bit properly will help you save costs while still ensuring operational efficiency.
To perform sharpening, you first need to place the drill bit at a suitable angle to the grinding wheel surface, usually about 59 degrees, this is the standard angle for most materials such as steel or aluminum. However, you also need to adjust it slightly if the material being worked on is softer or harder than usual.
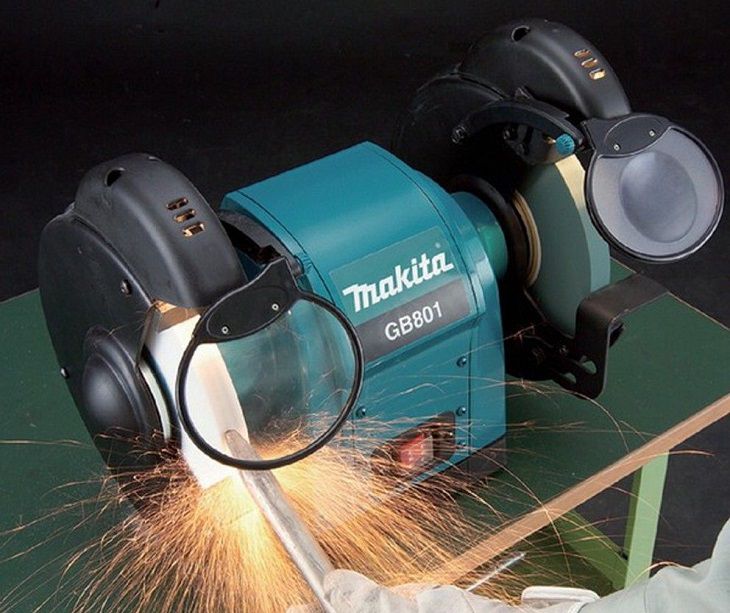
For beginners or those without experience, using a hand-held grinder is quite risky because you have to hold the machine and the drill bit at the same time, which is difficult to control and can easily cause safety problems. In this case, a bench grinder or a two-wheel grinder is the ideal choice. This device is not only more stable but also helps you accurately align the angle, minimizing errors when grinding.
An important detail that is easily overlooked is the back of the drill bit. While rotating and sharpening, you need to observe and make sure that the back of the bit is not higher than the cutting edge. If the back is too high, it will contact the material before the blade, causing the cutting force to not be transmitted properly, causing the drill bit to not be able to go deep and causing the edge to burn or the bit to slip.
When finished, rotate the drill bit along the vertical axis to check the shape of the two cutting edges again. If both sides have an even curvature and the back is slightly lower than the cutting edge, you can safely reuse the drill bit for the next job.
Bài viết liên quan:
Máy mài dạng hơi bút có gì hot ? Đặc điểm và ứng dụng
Cắt ngàm ống bằng máy mài góc đơn giản nhất
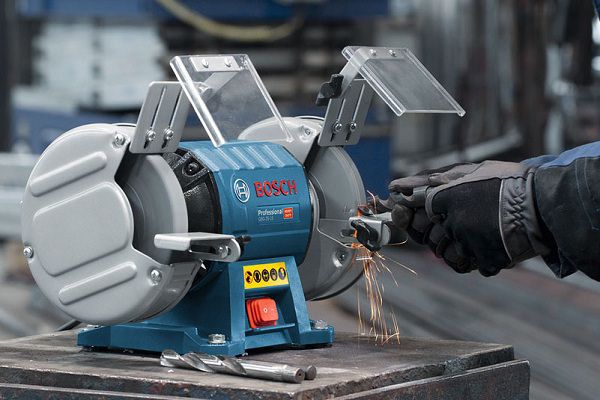
Sharpening drill bits with 2-stone grinder, what is the process?
Two-stone grinders are usually equipped with a coarse stone and a fine stone. When sharpening a drill bit, you should choose a coarse stone, which is suitable for handling worn edges and restoring the sharpness of the cutting blade.
Before starting, place the drill bit at an angle of about 59 degrees to the surface of the grinding stone. The cutting edge needs to be aligned properly so that it is parallel to the support edge on the machine, helping to keep it stable during the sharpening process.
When in contact with the stone, gently press the cutting edge against the grinding surface, then gradually lower the drill shank slowly. Do not rotate the drill bit while grinding because it can easily cause the angle to deviate or cause the edge to chip.
Finish one side, pull the drill bit out without changing the position of your hand, rotate it half a turn and then do the same on the other side. If done correctly, the two blades will be even and the drill bit can be reused as effectively as before.
Signs that the drill bit is not properly sharpened
If the drill bit still shows the following signs after sharpening, it is likely that you have not sharpened it properly. Continuing to use it in this condition can cause the drill bit to suddenly break due to the accumulation of heat and impact force during the drilling process.
One of the obvious signs is that the drill hole tip is no longer round, often due to the two cutting edges being asymmetrical.
In addition, if the drill bit has an unusual color or does not roll evenly as before, it is also a sign that the drill bit is having problems.
You should also pay attention to the brightness of the cutting edge. A dull, unpolished or scratched cutting edge indicates that it is not sharp enough to drill effectively.
During the drilling process, if you see a lot of burrs around the hole, the surface of the drill hole is rough or torn, check the drill bit immediately.
In particular, when the tip turns blue or purple, it means that the heat generated during drilling exceeds the tolerance of the material.
The sound of the drill is also a factor that you should not ignore. If you hear a rattling or grinding sound, it is likely that the drill bit is misaligned or no longer has enough cutting power, and the risk of getting stuck in the material is very high.
It is best to stop and re-sharpen the drill bit as soon as you detect one of the above signs to ensure safety and work efficiency.